If you are a solo photog and just starting out building your portfolio, my guess is that you've encountered the same problems. I know I have.
Here's what happened.
When you are a solo photographer and you're just starting out, you are literally shooting anything and everything you can. Or anyONE and everyONE you can. You need experience because you want people to fall in love with your work and trust you with their photos. So you shoot a family for free, but they can only meet during mid day. Or you photograph a wedding for a family member who can't afford a professional photographer (don't act like you didn't do it, you pros out there. You know a lot of you did, even if you know better now and would try to dissuade the noobs from trying it.) so you volunteered, but the wedding was in a back yard at 3pm in the afternoon in July and there wasn't a decent background in sight.
Here you are, stuck with the hardest light of the day with no assistant to carry a reflector and no additional light like an off camera flash. So, you do your best to get an even exposure, trying to stay away from blowing the highlights or losing the shadows but you still end up with exposures that are rough.
you All right, hotshot...what do you do? WHAT DO YOU DO!?
Sorry, the Speed reference just seemed to fit.
Here's what you do. You compensate using Photoshop because now you have images that need work, but FIRST you make a plan so that you don't fall into that trap again.
Buy yourself an off camera flash. If you're just starting out, you can pick up a Yongnuo Speedlight for less than $150. I have one myself as a secondary flash to my Canon 580 exII and so far my experience has been that the Yongnuo is a reliable little workhorse. This way you use fill light to make sure that your subjects faces and eyes are nicely exposed. This gives you more freedom, especially when you need to shoot alone and don't have the option of an assistant.
You also get yourself a reflector. The great thing about a reflector is that you can use anything from a really large stand alone reflector panel or a collapsible reflector to a white piece of poster board from WalMart (which I would only recommend for single portraits because those poster boards aren't that large.) This will allow you to bounce light back toward your subjects faces so that they are properly exposed. Depending on the size and type of reflector you buy, you may or may not be able to wield it on your own and might require and assistant to hold it for you.
Finally, you can get yourself a Variable Neutral Density Filter. This will allow you to shoot in bright sunlight at a wider aperture which will help to blur out any distracting backgrounds and allow you to use your off camera flash without needing to use High Speed Sync. This is the best of both worlds.
You also need plan ahead to try and have as much control over location and time as possible. Look for places with the possibility of open shade or natural colored reflectors like the side of a building (grey or white is best) and try to shoot during times when the light is softer and more diffuse.
Now, on to the critique that will cover the points I just laid out.
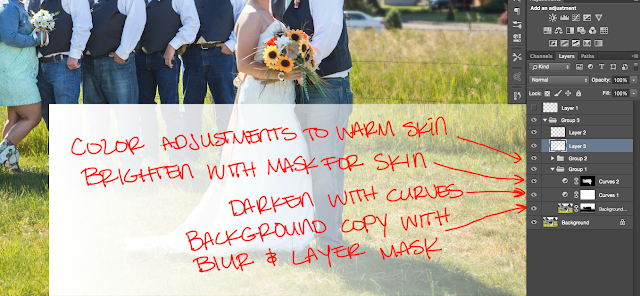
This shot was taken during mid day. First have a look at the light.
Light Quality: Hard light
Light Direction: High in the Sky
Light Quantity: Very Bright
Sarah was able to find a good middle ground where the highlights on the subjects aren't overly blown out and there is enough light on their faces in order that the exposure isn't a loss. She placed the sun at their backs to avoid having hard, unflattering light in their faces. The sun is even creating a nice rim light around her subjects. However, the light isn't ideal. It's too bright and contrasty to be flattering, and was too bright to allow Sarah to use a wide enough aperture to blur the distracting elements out of the background.
Here is a close up that allows you to see the light quality and the way that hard light creates a very sharp transition from highlight to shadow and more dramatic contrast.
Compensating for a missed exposure or difficult background in Photoshop is not the ideal, but it is a bit of a saving grace for those times when there were circumstances outside your control, such as the location of a wedding with difficult backgrounds. The most important thing to note is this: all the adjustments I am about to show you could have been done in camera with the proper equipment and technique.

The adjustments I made in Photoshop (done quickly so you could see the effect...I was not meticulous about my masking) are all things that could have been covered with the equipment and techniques mentioned above.
A Neutral Density filter to use a wider aperture allowing the background to blur distracting details.
A secondary light source (a flash or reflector) to bounce light back into the faces of the subjects and warm up the skin tones because shadows are cool and cause skin tones to have too much blue.
This shot is a good example because Sarah did not make any wrong decisions with her technique, she simply needed to expand her knowledge enough to overcome a difficult lighting situation. There was no open shade for her to use with enough space to shoot the entire wedding party, and she was able to get a useable exposure. With just a few adjustments in Photoshop, she can compensate for what she wasn't able to do on location.
Hopefully now that you know, bright midday sun won't be so intimidating!
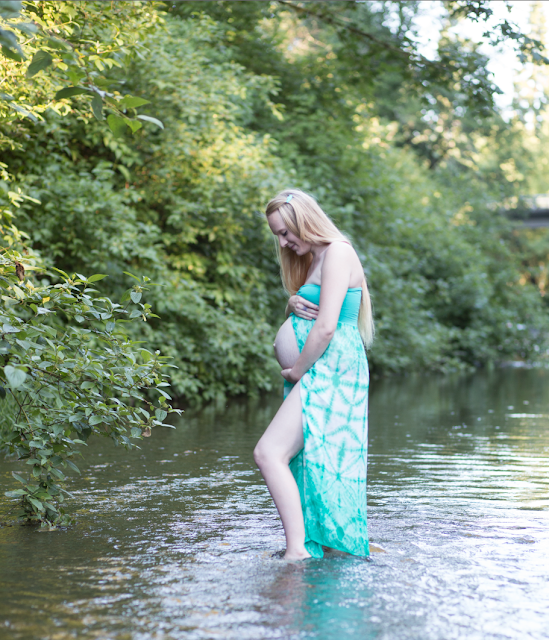
Sarah also brought me an example of soft light to use.
So, let's look at the light in this photo.
Light Quality: Soft
Light Direction: Diffuse
Light Quantity: Mid
The light in this shot is coming from the sky but is flagged by the trees and being diffused in the shade by leaves, water, and anything else the light can bounce off of. That is why the transition between highlight and shadow is so smooth that you almost don't realize it's happening. There aren't any bright highlights or dark shadows which means this exposure will be mostly midtones.
The soft light is much more flattering on the subjects skin, though the white balance is a bit cool. A simple change of white balance in camera would have warmed this image up. The composition might have been strengthened with careful use of the rule of thirds, but as far as light quality is concerned, for the time of day and mood she wanted in the photograph there is nothing wrong at all with the soft light in this sweet shot.
Did you follow along with the homework?
If you did and you'd like a critique of your work, or you have any questions about what we have covered so far in manipulating light, please share it in the comments section below!


No comments:
Post a Comment